
Freely available FTP server (File Transfer Protocol) with open source code ProFTPD allows wide variety of options similar to directives of webserver Apache. For upload or download of files and directories from /to server (e.g. website) is ProFTPD an ideal tool, that is trusted by large websites like SourceForge, Linkys or Harvard..

This guide works for Linux operating system Ubuntu in version 20.04 LTS (Focal Fossa) (odkaz na blog ubuntu verze 20.04). It is an LTS version (Long Term Support), that was published on 23. 04. 2020 and is officially supported by software company Canonical for 5 years since publishing, till April 2025. Developers are focusing in LTS on security and hardware compatibility, for it to be used on enterprise level.
Installing ProFTPD
Firstly it is necessary to secure that all packages are up to date. Let’s install all updated software in two commands in one go:
sudo apt update && sudo apt upgrade
If the system finds updated packages, it will ask, if we want to install them:
Do you want to continue? [Y/n]
Press the key y if you want to start updating process or key n, if you do not want to update. Then press Enter.
ProFTPD will be installed from the official repository:
sudo apt install proftpd
Press y to start the installation process or press n to not start it. Then press Enter.
We will run the installed ProFTPD (first line) and we enable it to run after system boots (second line):
sudo systemctl start proftpd
sudo systemctl enable proftpd
Secure FTP connection
First we have to install OpenSSL:
sudo apt install openssl
Press y to start the installation process or press n to not start it. Then press Enter.
Then generate SSL certificate for ProFTPD:
sudo openssl req -x509 -newkey rsa:2048 -keyout /etc/ssl/private/proftpd.key -out /etc/ssl/certs/proftpd.crt -nodes -days 365
It is not necessary to enter any information therefore press Enter to write down empty values.
There are two certificates created for which we now set rights:
sudo chmod 600 /etc/ssl/private/proftpd.key
sudo chmod 600 /etc/ssl/certs/proftpd.crt
In the configuration file ProFTPD proftpd.conf locate line that contains #Include /etc/proftpd/tls.conf (in our case line number 140) and delete the number sign # (first symbol on the line). Under the line with content Group (here on line 71) we add a new line (in our case line 72) with content DefaultRoot /var/www/html/ (path may differ in your case):
sudo nano /etc/proftpd/proftpd.conf
File is saved by pressing Ctrl + X, then press y and then press Enter.
Open the configuration file tls.conf
sudo nano /etc/proftpd/tls.conf
and delete all its content. Then add these lines:
<IfModule mod_tls.c>
TLSRSACertificateFile /etc/ssl/certs/proftpd.crt
TLSRSACertificateKeyFile /etc/ssl/private/proftpd.key
TLSEngine on
TLSLog /var/log/proftpd/tls.log
TLSProtocol TLSv1.2
TLSRequired on
TLSOptions NoCertRequest EnableDiags NoSessionReuseRequired
TLSVerifyClient off
TLSRenegotiate none
</IfModule>
Save the file by pressing Ctrl + X, then press y and confirm with Enter.
Restart the ProFTPD, so the changes in configuration file would take effect:
sudo systemctl restart proftpd
Create user and log in
To be able to copy, edit and delete files and directories in the set path DefaultRoot /var/www/html/ (path may differ in your case), we need to create a new user:
sudo adduser ftp1
In the process of creating account ftp1 we firstly set and then confirm the password This.Password.is:strong. Do not fill other information (only press Enter) and at the end confirm with keys y + Enter that all information on the new account is alright.
For testing the function of the secured connection via protocol FTPS we need to install and run a freely available opensource application FileZilla, that supports all heavily used operating systems (Windows, MacOS and Linux). In the menu File > Site manager we add a new site Press the New site and eneter a name of the new site (in our case WebSupport). Other setting is visible on the picture, while Host (here IP adresa 185.87.12.38) may differ in your case and user (here ftp1) long with password (here This.password.is:strong) were created earlier in this guide:

Before the connection the FileZilla asks if you want to trust the certificate. Select the left option Always trust this certificate in future sessions and then select OK:
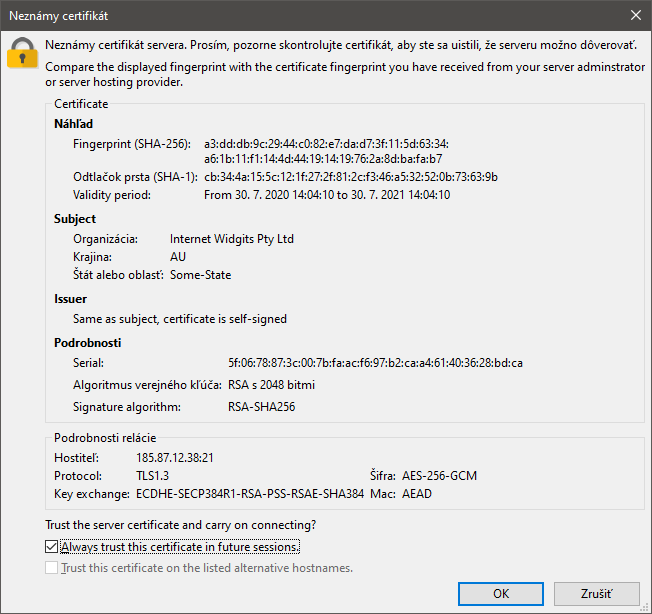
After acknowledging the certificate FileZilla loads the content of the directory DefaultRoot /var/www/html/ (path may differ in your case), in which we can from now on edit, copy or delete any files as we see fit.
Summary
We have installed an FTP server, that supports secured connection FTPS. We have also learned how to connect to the created FTP server. Now we can upload and download file to/from server, which we can use for example for website creation.