If on the Virtual server (VPS) there is LEMP, the last thing that is to be done is to set up basic internet security for displaying website via HTTPS protocol. Free and fully automatic solution exists as Let’s Encrypt SSL.
Let’s Encrypt (LE) is a certificate authority, that automates a not so easy process for manual creating, checking and signing , installing and renewing certificate for free. The goal is to provide easy, fast and free solution for encrypting via TLS protocol on the website (WWW). Credibility of this service is supported by the parties like Google, Facebook, Mozilla Foundation or Cisco.
Register the domain and set the DNS records
To receive the certificate from Let’s Encrypt, first a domain has to be registered, because it is not possible to obtain the certificate for IP address so far.
After the domain is registered we need to connect IP address to the domain. We edit the DNS records. in a way to display the content of your website, at this moment via unsecured protocol HTTP.
http://domain-name.tld
Installing Let’s Encrypt certificate (Certbot)
Firstly it is necessary to secure that all packages are up to date. Let’s install all updated software in two commands in one go:
sudo apt update && sudo apt upgrade
If the system finds updated packages, it will ask, if we want to install them:
Do you want to continue? [Y/n]
Press the key y if you want to start updating process or key n, if you do not want to update. Then press Enter.
To use the services of the Let’s Encrypt authority, we need to first install the Certbot tool:
sudo apt install certbot python3-certbot-nginx
Press y to start the installation process. Then press Enter and wait for the installation to finish.
With one command we can get the certificate and set Nginx, so the website would be secured via protocol HTTPS:
sudo certbot --nginx
In the process of setup we create an e-mail address of the administrator, we need to agree to the terms of use (keys a + Enter), we would rather not made the admin mailbox public (keys n + Enter), enter the domain name (e.g. domain-name.tld) and let the website redirect from HTTP to HTTPS (number 2 + Enter).
Test the function of secured connection
Last thing remains: to test if the whole process of installation of the certificate has been done correctly. In the web browser we load the website via HTTPS:
https://domain-name.tld
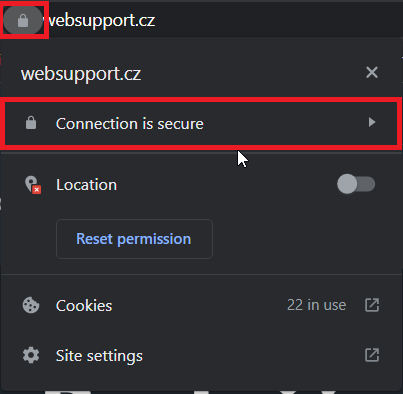
The result should speak for itself, if the website is loading without issues securely and with a valid certificate. In the web browser select the icon of the locked lock:

Summary
We have installed the tool Certbot, that allows us to obtain a free security certificate for the domain from Let’s Encrypt service. From now on we can display our website securely via HTTPS, and we don’t need to worry about expiration, for it is renewed automatically.
