Feature WordPress Multisite allows to use 1 WordPress installation on multiple websites. To work correctly it may be necessary to edit some of the hosting settings in WebAdmin.
Installation of WordPress Multisite
Installation of WordPress multisite requires editing in wp-config.php and .htaccess files. We would recommend to follow the official guide available at na wordpress.org. There are two base modes that will work.
- directories – sites in the network are using directories, for example domain.tld/directory1 and domain.tld/directory2.
- subdomains – sites are using subdomains in the network, for example subdomain1.domain.tld or subdomain2.domain.tld.
Setting up your hosting for subdomain mode
In contrast tot directory mode, subdomain mode requires additional settings for working properly
- Wildcard DNS record
- Change of root directory of the subdomains
- WildCard SSL certificate


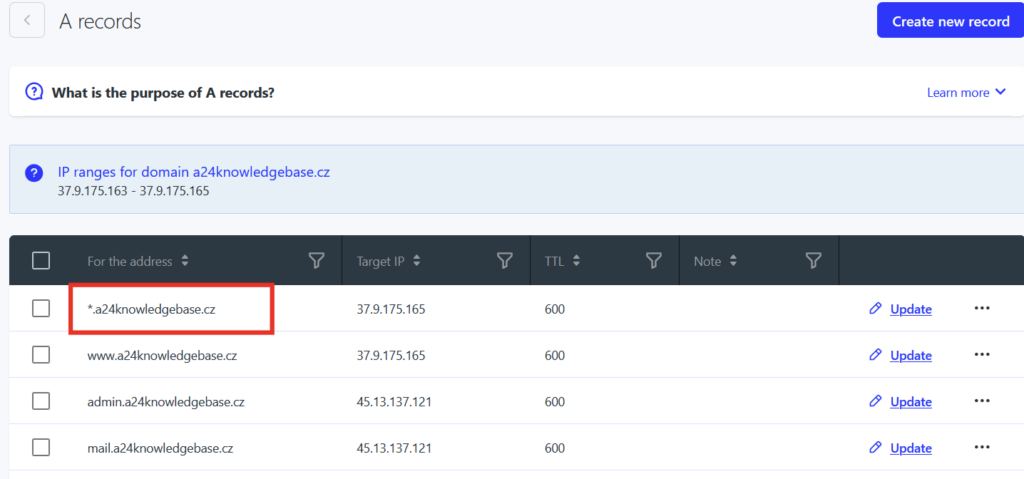
Wildcard DNS record
So called wildcard A DNS record in a form of *.domain.tld directs all subdomains to our IP address. It is already set for each domain that uses our hosting by default. If it does not exist, you can simply add this record.
Change of subdomain root directory
Default root directory for subdomains is domain.tld/sub. For correctly working WordPress multisite you need to change this settings.

- Log in to the WebAdmin and go to web settings (Web > Services)
- Select Create new service
- Select first option – Displaying web content
- To Address field enter desired subdomain, allow option Own root directory and select a directory, where the WordPress installation is located. By default it will be domain.tld/web.
- Save to confirm changes. Changes will take effect in several minutes.
Alternative to the WebAdmin changes is creating a link (symlink) via Shell Console.
WildCard SSL certificate
To prevent that your subdomains will be “not secured” you have to use wildcard SSL certificate that covers all subdomains and provides them with HTTPS.
For each hosting there is available Let’s Encrypt Wildcard SSL certificate completely for free. You can activate it as shown in our guide: Enabling Let’s Encrypt SSL certificate (link to Let’s Encrypt article).
Domain mapping in WordPress multisite
In WordPress multisite you can use not only subdomains e.g. subdomain.domain.tld but even separate main domains e.g. domain2.tld as well. The same works with directory mode, so you can use both domain.tld/directory and domain2.tld.
Domain mapping is built-in feature since WordPress 4.5 and does not requires any plugin.
Following steps will be required for proper functionality:
- Multihosting and domain redirect
- Installation of SSL
- Change of URL adresy in WordPress
- Editing of wp-config.php file
Multihosting and domain redirect
If the prepared WordPress multisite runs on the ‘main domain’, add other domains as redirect. Then edit their root directory to point root directory of the ‘main domain’.
- Log in to the WebAdmin and go to hosting settings.
- In the overview of connected domains continue by selecting Add new domain select the wanted domain from the list.
- After the domain is added successfully go to redirect settings of the domain.
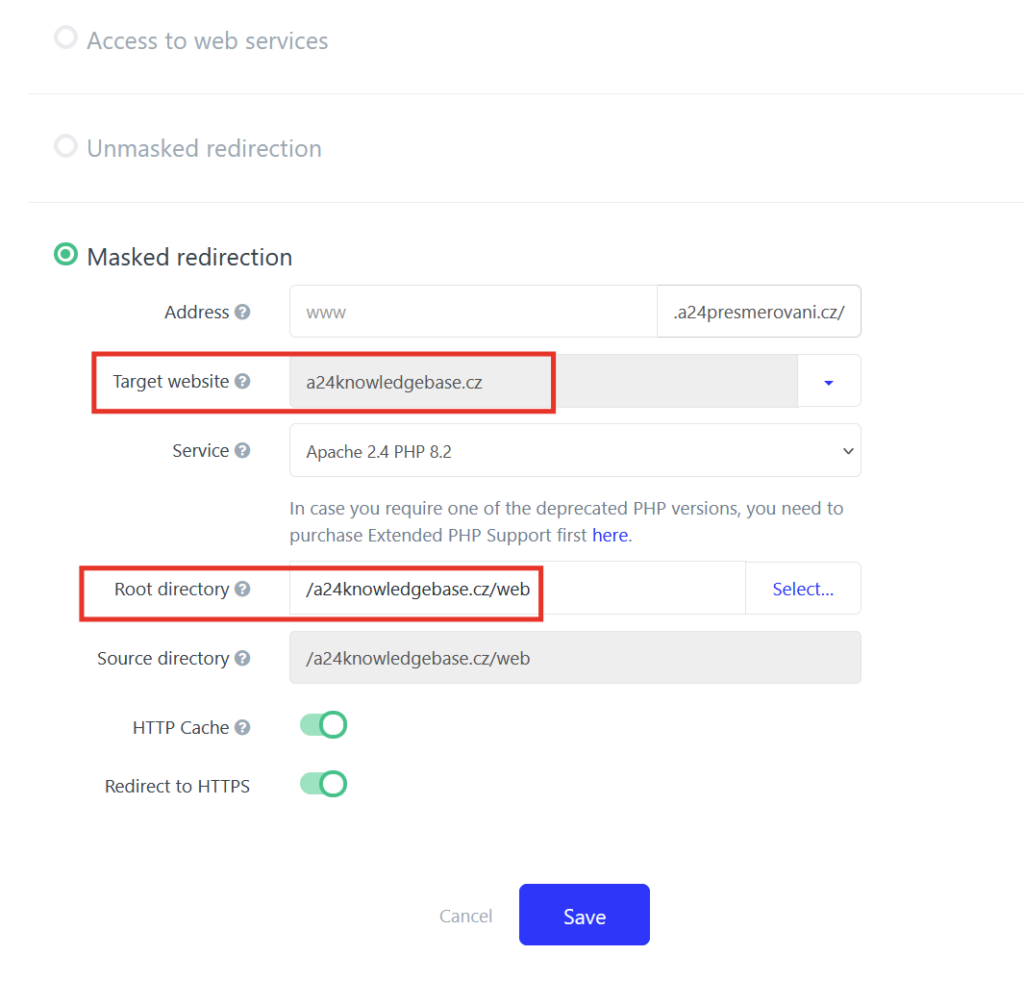
- From the available options select the third – Masked redirect.
- To the field destination website select the ‘main domain’. In the field root directory select the directory where the WordPress is installed. By default it will be domain.tld/web.
- After your enter these details select Save. The change will be done in several minutes.
Installing SSL certificate
It is necessary to use a SSL certificate so the website would not appear as not secured in the network. The certificate will make sure for seamless redirect to HTTPS.
For each domain connected to the hosting a Let’s Encrypt Wildcard SSL certificate is available for free. How to install this certificate can be found in the following guide: Let’s Encrypt SSL certificate activation
Change of URL in the WordPress
- In the WordPress administration go to Pages in the left menu.
- Select the desired subpage, you want to map to another domain. In a case of subdomain option it will be one of the subpage.domain.tld. Continue by selecting Edit.
- In the field Page address (URL) change the URL address to a new domain. For example https://subpage.tld. Save the changes.

Change in the wp-config.php file
During the login to the WordPress you may encounter an error message notifying about blocked cookies. Open wp-config.php in the FTP and add a following line of code, that you entered during the installation of WordPress multisite.
define('COOKIE_DOMAIN', $_SERVER['HTTP_HOST']);