1. Select File in the top panel. Then select Account settings

2. On the screen for Auto account setup select the checkbox Manually configure server and then press Next.

3. Select the type of your account – POP or IMAP. POP3 or IMAP, You can find more information about protocols in our guide

4. Enter your details
Your name – which will be shown to the recipient
Account type – POP3 or IMAP
Incoming mail server:
IMAP:
Incoming mail server: imap.websupport.cz
POP3:
Incoming mail server: pop3.websupport.cz.
Outgoing mail server (SMTP): smtp.websupport.cz

or

5. Edit the settings in “More settings … “. On the Outgoing server tab select My outgoing server (SMTP) requires authentication.

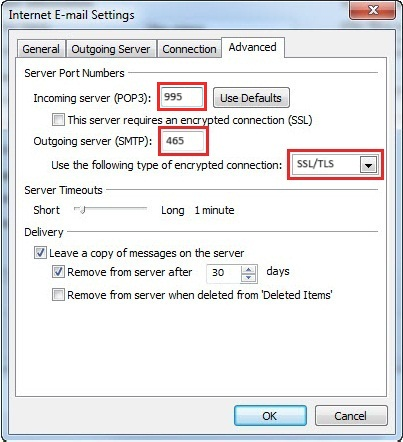
6. Edit ports in Advanced tab.
POP3
For encrypted connection, with SSL use port 995.
IMAP
For encrypted connection, with SSL use port 993.
SMTP
For encrypted connection, with SSL use port 465.

7. Confirm the settings with OK and then select Next after you test the connection.

8. After you select Close you can finish the setup and check your mail.
